
As Malaysians, it’s pretty much normal in our culture to line up for food and drinks.
Being a foodie community, it won’t come as a surprise to see long queues at restaurants, cafes and even hawker stalls due to a certain trend that blew up on social media. The latest one we can all see is bubble tea, and if you’ve been to SS15, Subang Jaya recently, you’d agree.
Here at the Vulcan Post office, we’re all enthusiasts of bubble tea but the thought of needing to wait in line for hours just for that one cup doesn’t seem so good.
So we thought to ourselves, why not make some bubble tea ourselves? Personally, I thought that it wouldn’t be too much of a challenge—we’ve got the internet on our side.
Armed with a few YouTube videos and an online tutorial, I confidently assured my colleagues that we’d best head back to the office for my homemade rendition, once we picked up the necessary ingredients required for the drink.
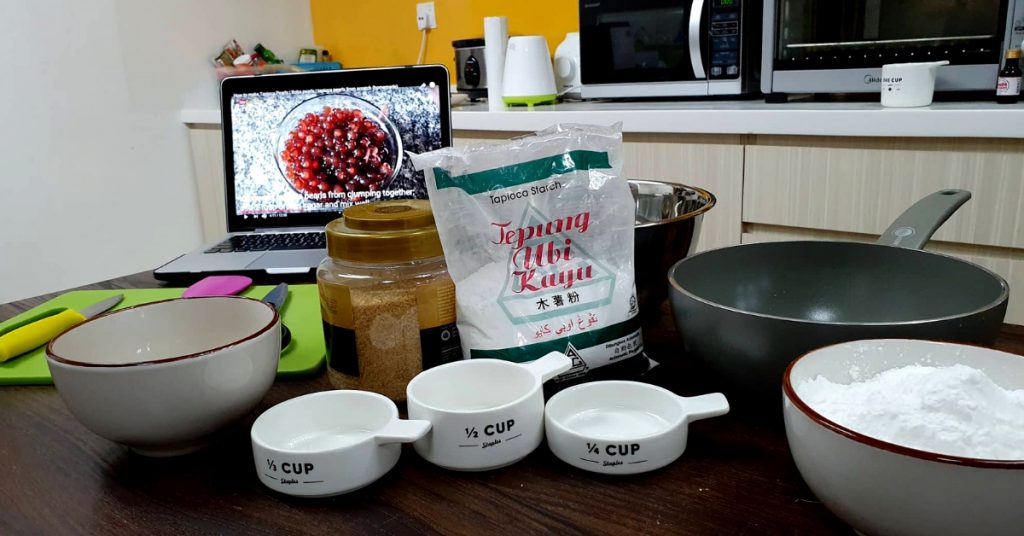
As I’m sure that you’d like to know how well (or badly) I fared, I took the liberty of documenting the entire process (in 4k!) on the Samsung Galaxy S10 we had in the office—let me know if you’d like a private tutorial session on how to make homemade bubble tea.
The Preparation Stage
I was pretty surprised (and relieved) to discover that the list of ingredients needed for the recipe is relatively simple:

- ⅔ Cup Tapioca Starch
- 1 Cup Brown Sugar
- Black Tea Bags
- Milk/Cream
Sounds simple enough, right? Well, the ingredients were easy enough to find, although I must admit that I used organic cane sugar as a substitute for the brown sugar mentioned in the recipe.
1. Dissolve sugar into boiling/simmering water
This seemed like a simple enough step when I was still researching recipes, so I jumped right into it. However, I learnt a few things right off the bat. Firstly, make sure that your water is boiling as you’re tipping sugar into the saucepan.
Secondly, find out what the difference is between simmering and boiling. It’s a very important distinction, apparently.
Once you’ve emptied the sugar into the pan, you should bring the heat down just a tad, and keep it to a simmer. Make sure that all of the sugar has fully dissolved, before moving onto the next step.
2. Add in tapioca starch
Keep the mixture simmering, and add in your tapioca starch. In Malaysia, perhaps it would be best to ask for Tepung Ubi Kayu—I had a fair bit of trouble getting stores to get the difference between tapioca flour and starch.
For me, I found this process a lot more difficult than I had initially anticipated. Thankfully, I was saved by my colleague’s #protip: mix more tapioca starch in until the mix resembles a gooey-like substance.
At the end of this process, you should have something that looks like this:
3. Shaping the pearls into little balls
For lack of a better way to say it, yes. This was probably the part of the process I was most looking forward to while watching tutorial videos. The online recipe basically told me that I had to knead the flour mixture for a few minutes, before cutting the dough up into smaller sizes.
As you can see, it didn’t go entirely as I had imagined it. Thankfully, after tweaking the mixture a little and warming it up again, I managed to achieve a mix with just the right viscosity—sticky.
Following that, my next step was to cut up the dough into smaller pieces, which I then proceeded to roll into small, ball-shaped pearls.
Protip: Make sure you coat each pearl with flour/tapioca once you’ve shaped them. This is to avoid the pearls from sticking to each other.
To be honest, it was a relief to be done with the dough-kneading part of the recipe. It’s a lot more exhausting that it appeared to be on Youtube, so lesson learnt.
As per my instructions, I popped the pearls back into a boiling pot of water, and waited for approximately 5 minutes. Once the pearls had gone translucent, they were cooked and ready.
Protip: If you’d prefer for your pearls to be dark in colour, make sure you use dark brown sugar in the mix. In my case, I used cane sugar, which resulted in golden-coloured pearls.
4. Completing the drink
This was the part that I was well prepared for: the tea. My favourite kind of tea is Earl Grey, but given that I was attempting to make the conventional Taiwanese Bubble Tea, I opted for English Breakfast tea.
Yes, I know. It doesn’t exactly look like the ready-made pearls from your favourite bubble tea shop. Yes, they aren’t perfectly round in shape. Yes, they’re oddly-coloured.
But guess what? They tasted pretty damn good, if I may say so myself. My colleague, on the other hand? I don’t think she was too impressed.
-//-
So maybe bubble tea (or cooking in general) isn’t my thing. But if there’s one takeaway from this little tutorial, it’s that the videos sure as heck look good.
For example, while my colleagues and I recorded the process, we had to deal with a few problems: a hugely messy kitchen area, and dirty hands. Thankfully, the Samsung S10’s video stabilisation (VDIS) software ensured that the shakiness of our hands wasn’t translated to the end-video.
In addition to that, the wide-angle lens on the S10 came in useful for us—the wide field of vision helped us capture the entire, huge, messy table.
And of course, I still can’t get over how amazing the videos look in 4k, especially with the 60FPS settings turned on. There’s no noticeable drop in framerate throughout the videos, despite the multiple moving objects in some of the videos.
The lesson to all of this? If you’re going to record a failure, you might as well record it in the best quality available.
- If you’d like to know more about the Samsung Galaxy S10 series, click here.
This article is written in collaboration with Samsung.