
The argument of whether drawing is a skill you’re innately born with or one that’s developed with practice aside, I know that I simply have very little experience and next to no practice with art.
Painting IRL is kind of an expensive activity, and the idea of digital art was just too intimidating to ever consider.
But along came the Samsung Galaxy Tab S8 Ultra with its large 14.6-inch screen, S Pen, and PENUP app, and I knew my chance to try my hand at digital art had come.
Though PENUP has a bunch of ready lineart for me to simply colour in and call it a day, I wanted something that would be a little more challenging, something that I’ve never done before: create art from (almost) scratch.
If I was also going to spend time doing something, I wanted it to be meaningful for me, and something that I could be proud of when I was done.
So, I chose to draw my Genshin Impact favourite.
Preparing the canvas
Here’s the part where I get to briefly gush about my favourite. I’ve been playing Genshin Impact since October 2020, and it’s a game that has changed my life in so many ways, but most of all, it kept me sane throughout the pandemic.
Over time, I found several favourite characters, but one of my absolute favourite ones is Xingqiu, a sword user. I love his elegant outfit, movements, and overall personality.

(For those more familiar with how the game works, my proof of love for him is shown by double-crowning him, and potentially triple-crowning him soon. We don’t talk about artifacts though…)
But back to the drawing.
I didn’t want to ruin this from the get-go, so I used my beginner privileges and decided to start off by tracing a piece of art I liked. It was an official emoji of Xingqiu from the game.

Lining out my plan
In PENUP, you can save a picture to your gallery and use the “draw over image” function to trace over a picture. One downside to this, however, is that I couldn’t really adjust my canvas sizing to fit the full picture I wished to trace.
Once I had my canvas ready, it was down to getting started, and boy, was I feeling anxious. My first order of business was opening up a new layer (Layer 2) on top of the image (Layer 1) for me to draw on.
Then, I picked a brush and got to work with lineart. To trace, I lowered the opacity of the original image to about 50%, that way, I could still see both the details I wanted to trace and my own lineart.

Something I quickly learnt was that pen pressure is trickier to master than you’d think, especially when it comes to getting thin and thick strokes just right, where you like.
It was also a little tough to draw some lines smoothly because I couldn’t rotate my canvas freely, my only option was to fully rotate the entire screen vertically or horizontally. Though I looked for it, it seems like PENUP also lacks the customisable pen stabilisation software that other drawing software like Paint Tool SAI and Clip Studio Paint have.
If you look at my drawing from far away enough though, the lineart could pass off as perfect. Whether this is a testament to my skills or how good the S Pen and its 2.8ms latency is, I’m not too sure.

The palm rejection on the Tab S8 Ultra is great, and I had no issues with the screen randomly freezing up or freaking out because my palm and the S Pen were being registered at the same time.
To free up my ability to move around the canvas as I pleased, I could also move my palette and brush tools to other edges of the screen, like on the left, which would be out of the way of my right drawing hand.
I could also entirely hide the UI so that I was left with just my brush and the canvas, which ensured I would not accidentally trigger any wrong buttons.
Once I was done with my lineart, it was time to head into my next battle: colouring. I wasn’t about to chicken out and just be satisfied with some lines on my canvas.
Bringing some colour to the piece
This was where more layers were needed, and I signed into my Samsung account in order to add more, as you only get a maximum of two layers without an account.
Once signed in, I could add up to 12 layers, which posed some limitations, but more on how I overcame that later.
To get the right colours for my drawing, I turned up the opacity of Layer 1 (the original image I started with) then used the dropper tool to copy a specific colour.
Colouring was easy too with the decent selection of brushes and tools at my disposal, and I could zoom in quite a bit and use a finer brush to get my details right.

If I still managed to colour outside the lines, I could easily erase my mistakes by holding down the S Pen button and going over the mistake.

If you plan to do this a lot, I would recommend turning off Air Actions and Screen Off Memo so they don’t keep popping up irritatingly when you’re just trying to erase something.
Flat colours were easy enough for me to do, but shading and blending were a whole different ball game.

Remember I mentioned that you could get up to 12 layers in PENUP? Though that sounds like a lot, I learnt that I actually needed more for colouring, like a lot more. From what I’ve seen, more skilled artists can sometimes use up to hundreds of layers.
Thankfully, I just needed a few more, so my easy way around that was to merge some completed layers, freeing up a few more layer slots.
For example, once I was done with the base skin colour, shading, blush, etc. on their separate layers, I merged them, freeing up about two layers that I could then use for facial details.

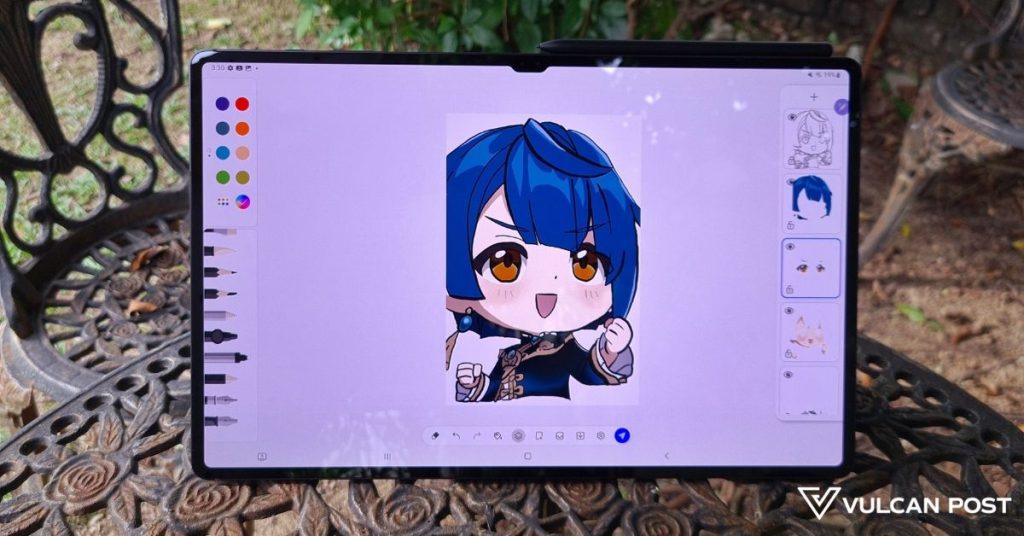
And I was done!
After about three hours, I was finally done with my magnum opus.
Well, what do you think? How’d I do? What do you think of the techniques I shared above?
For someone whose digital art skills were limited to just this Startup Highlight of the Week video we did below, I think I did decently well.
At the very least, I impressed my colleagues…
My takeaway from this experience was that digital art is only as intimidating as you make it seem for yourself (a lesson that can be applied to a lot of other things).
In fact, once I found my groove and built my confidence in lineart and colouring, I realised the minor imperfections didn’t matter to me, I was having so much fun.
I would totally do it again too, and I actually did start working on some art of my other favourite, Xiao, but I’ve yet to finish it.
Though I traced and referenced the main image a lot, it was still satisfying to create something nice pretty much from scratch with the help of the Tab S8 Ultra, S Pen, and PENUP.
I was able to draw quite comfortably both in my lap and on a table, something that’s probably important for digital artists working on larger or more intricate pieces while on the go.
The S Pen’s battery consumption was also good, going from 100% to about 50% over three hours, and if it runs out of juice, it just means it’s time for a deserved break.

Since we’ll have the tablet for the foreseeable future, if I keep practicing, perhaps one day I might reach a level where I can draw without tracing over something first. As for finding my own art style though, uh, give me another three years maybe.
- Read more of our articles on the Samsung Galaxy Tab S8 Ultra here.
- Learn more about the Samsung Galaxy Tab S8 Ultra here.