
A while back, my coworker Joyce revealed that she doesn’t really get VTubers, so much so that she actually wrote an article about it.
I won’t call myself a fan of VTubers, but once in a while, I get recommended a Hololive or Nijisanji video on my feed that ends up sending me down a virtual rabbit hole.
Did you know: Hololive and Nijisanji are two big virtual YouTuber agencies based in Japan, with a massive global reach.
That would never happen for Joyce, who thinks VTubers can be a little (cough, a lot) cringey.
So, I wondered—what if I became a VTuber myself? Would someone like Joyce find the content a bit more appealing?
More importantly though, what’s it like even trying to get started in the world of VTubing? After coming across a free VTuber model creation app called VRoid Studio which is available on Steam, I decided it was time to find out.
Creating my model
Full disclaimer, I didn’t go as far as to try and secure a VTuber career with an agency, nor did I actually become a VTuber streamer, but I did get a taste of what setting up a VTubing model entirely on my own would be like.
Everything would be created with VRoid Studio, since it’s supposed to make VTubing more accessible to the masses through easy model creation processes. Plus, the models created can be used for commercial use so I wouldn’t run into any copyright issues.

It’s a 3D character creation software, but to keep things simple, I focused on the 2D aspect, since motion-tracking a three-dimensional model would require some more advanced tech such as motion capture equipment that I don’t have.
The design process was fun, much like creating an avatar on Sims. You can adjust minute details of the face such as the jaw, forehead eyes, and even teeth. You could be an elf or a vampire by tweaking some of these features.
While being a supernatural creature would’ve been fun, I decided to go for a simple, mischievous-looking design. My character has metallic blue hair in pigtails and a pink sweater with cloud designs on it, created using the texture editor on VRoid Studio.

Once satisfied, I exported the model as a VRM file so it could be plugged into my tracking software.
Setting up the camera/tracker
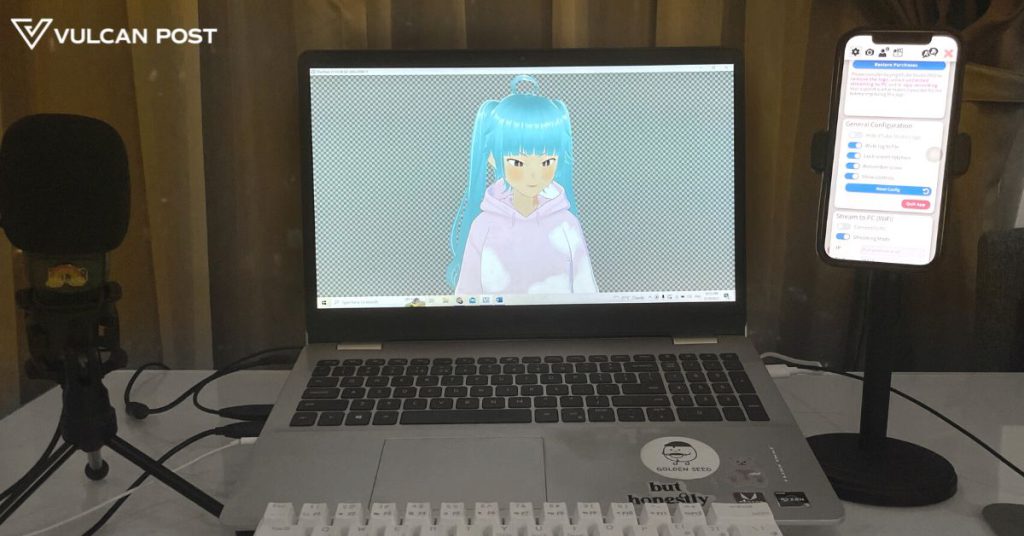
To translate my real-life expressions and movements into the VTuber model, I downloaded VSeeFace. Yet another free application, VSeeFace is an easy-to-use avatar puppeteering programme.
The app itself is pretty rudimentary, which is actually beneficial for a newbie like me since I wasn’t overwhelmed with too many options.
After uploading the VRM file my model was on, I was able to start tracking my face using the webcam.
However, given the dingy quality of my webcam, I decided I needed something a little better: a phone camera.

I figured out how to stream the feed from my phone onto my laptop the way I figure out how to do many complicated things—through a YouTube video.
First, I needed to download an app on my phone called VTube Studio. Once again, it’s a free, simple app. Technically, it’s an app that can bring Live2D models to life, but since I had a VRM model, I needed to go through VSeeFace.

In this app’s settings, I activated the third-party PC clients option. Next, figure out your IP address on your phone and copy that number into the settings in VSeeFace.
Once that’s done, it should immediately be sourcing the video feed from your phone’s camera.
The tracking was nothing detailed or advanced, though. It could capture blinks, head movements, and whether my mouth was opening or closing. But on the expressivity front, it was a little lacking.
To counter this, though, I could manually adjust my expressions. There are six to choose from—neutral, fun, angry, joy, sorrow, and surprised. It’s certainly not intuitive, but once you’re able to memorise the hotkeys, it can be somewhat effective.

I was amazed by how simple this was. I didn’t need a fancy webcam or any special tech, but just whatever was already available to me.
Debuting as a streamer
With absolutely no experience as a streamer, my final challenge was intimidating at first. But after looking into it, I realised it was easier than I thought.
To stream on Twitch, all I needed to do was set up two-factor authentication on my account. Next, I downloaded OBS Studio (another free platform) so I could use the game capture function to display by model.
OBS is a very popular app that streamers use, so I won’t get into the details of using it. The point is, it’s a flexible software that lets you customise your settings and stream directly to Twitch from it.
I found that VSeeFace is also fairly easy to use for streaming purposes. After booting up my model, I noticed a little symbol in the bottom right corner. Clicking it removes all the interface and keys out the background, leaving the VTuber model lad over a transparency grid.
Next, I took a deep breath, and hit the start stream button.

It… worked. I got my managing editor Sade to tune in for my first broadcast, and it simply just worked. There was apparently also some delay between the audio and the visuals, but other than that, I did what I set out to do, i.e. stream as a VTuber.
Of course, compared to professional virtual streamers, the quality of my motion capture was on the very low side. It couldn’t detect a lot of my facial expressions or any of my limbs, but I was fine with that. It was still decent, considering my barebones set-up.
Streaming in the future
While streaming, my laptop and phone were burning up because of all the software I was using. I’d imagine that someone who wants to pursue this professionally or even just as a hobby should invest in better equipment.
Still, I could not be more pleased to learn that it doesn’t take that much effort to start streaming as a VTuber. Emphasis on the word “start”, that is.
Sure, the model isn’t advanced, but it’s a beginning. I mostly appreciated the ease of entry and overall accessibility of VTubing that VRoid Studio, VTube Studio, and VSeeFace offered. It’s a true testament to how far our technology has come and how viable of a career or hobby virtual streaming can be.
Will I continue streaming as a VTuber? Probably not for the foreseeable future, but I also don’t see why not. To me, using a VTuber model also feels more interesting than just streaming with a face cam, and I feel much more comfortable (i.e., less awkward) with it.
It’s also a much more viable option if you don’t have a quality camera, which is somewhat expected from a “good” streamer. There’s also the fact that it provides a layer of safety for those who don’t want their faces out there on the internet.
If you’re someone who’s interested in streaming but too shy to show your face, you can obviously just go faceless, but VTubing is a fantastic, more interactive option in my opinion.

To summarise, I had to download four apps to make this happen—VRoid Studio to create my avatar, VSeeFace to capture my face, VTube Studio to use my phone’s camera, and OBS to stream everything to Twitch.
This set me back a total of roughly four hours of my life, less than 30GB of storage space, and zero dollars from my bank account.
And hey, I get to write a whole article about it, so I’ll take this as a win.
- Read other entertainment-related articles we’ve written here.